Curving text in Google Slides can add a unique and creative touch to your presentations, making them more engaging and visually appealing. While Google Slides doesn’t have a built-in feature for curving text, there are several workarounds you can use to achieve this effect. In this comprehensive guide, we’ll explore different methods to curve text in Google Slides, ensuring your presentations stand out.
Method 1: Using Troygram Curve Text
One of the easiest ways to curve text in Google Slides is by using an external tool like Troygram Curve Text. Here’s how you can do it:
- Visit Troygram Curve Text: Open your web browser and go to the Troygram Curve Text website.
- Enter Your Text: Type the text you want to curve into the text box.
- Adjust the Curve: Use the sliders to adjust the arc size and spacing of the letters until you’re satisfied with the curve.
- Copy the Image: Once you’re happy with the curved text, right-click on the image and select “Copy Image.”
- Paste into Google Slides: Open your Google Slides presentation, navigate to the slide where you want to add the curved text and paste the image (Ctrl+V or Command+V).
- Resize and Position: Adjust the size and position of the curved text image to fit your slide layout.
Method 2: Using PowerPoint
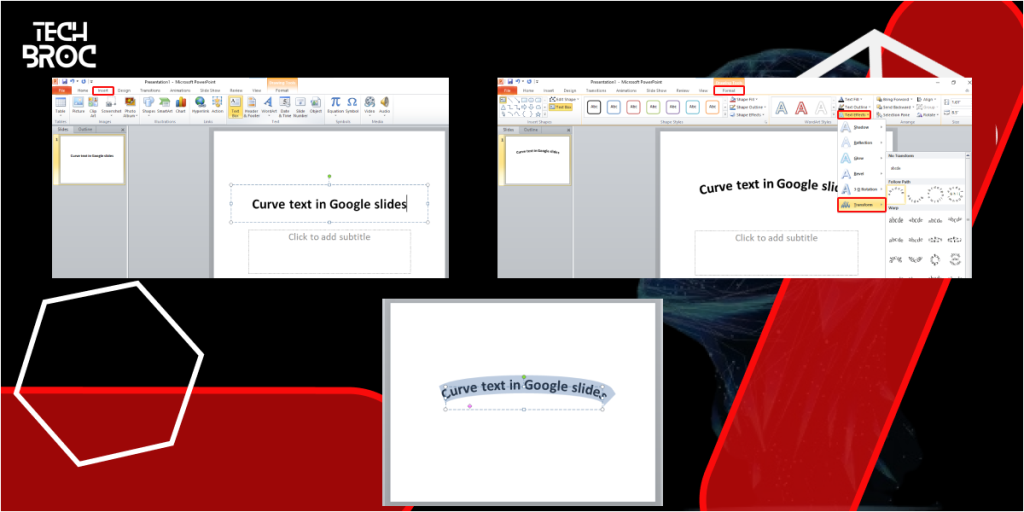
If you have access to PowerPoint, you can create curved text there and then import it into Google Slides:
- Open PowerPoint: Launch PowerPoint on your computer.
- Insert Text Box: Click on the “Insert” menu and select “Text Box.” Type your desired text into the text box.
- Apply Text Effects: Go to the “Format” tab, click on “Text Effects,” and select “Transform.” Choose the “Arch” or “Circle” effect to curve your text.
- Copy the Curved Text: Once you’ve curved your text, right-click on it and select “Copy.”
- Paste into Google Slides: Open your Google Slides presentation, navigate to the slide where you want to add the curved text and paste it (Ctrl+V or Command+V).
- Resize and Position: Adjust the size and position of the curved text to fit your slide layout.
Method 3: Using Canva
Canva is another excellent tool for creating curved text that you can import into Google Slides:
- Visit Canva: Open your web browser and go to the Canva website. Sign in or create an account if you don’t have one.
- Create a New Design: Click on “Create a design” and select “Custom dimensions.” Enter the dimensions that match your Google Slides presentation.
- Add Text: Click on the “Text” tab, choose a text style, and type your desired text.
- Curve the Text: Select the text box, click on “Effects,” and choose the “Curve” option. Adjust the curve to your liking.
- Download the Image: Once you’re satisfied with the curved text, click on “Download” and save the image to your computer.
- Insert into Google Slides: Open your Google Slides presentation, navigate to the slide where you want to add the curved text, and insert the image by clicking on “Insert” > “Image” > “Upload from computer.”
- Resize and Position: Adjust the size and position of the curved text image to fit your slide layout.
Additional Method: Using Google Drawings
Google Drawings is another handy tool for creating curved text that can be imported into Google Slides:
- Open Google Drawings: Go to Google Drawings.
- Insert Text: Click on the “Text Box” icon, then draw a text box and type your desired text.
- Use Word Art: Go to “Insert” > “Word Art” and enter your text. Drag and shape the Word Art into a curve manually.
- Save and Insert: Once satisfied, save the drawing. Open your Google Slides, and insert the drawing by selecting “Insert” > “Image” > “Drive.”
- Resize and Position: Adjust the size and position of the curved text image to fit your slide layout.
Additional Method: Using Graphic Design Software (GIMP/Photoshop)
For more advanced customization, you can use graphic design software like GIMP (free) or Photoshop:
- Open GIMP/Photoshop: Launch the software and create a new document with the desired dimensions.
- Add Text: Use the text tool to type your text.
- Curve the Text: Apply the curve effect using the text transformation tools.
- Export the Image: Save the curved text as an image.
- Insert into Google Slides: Open your Google Slides presentation and insert the image by clicking on “Insert” > “Image” > “Upload from computer.”
- Resize and Position: Adjust the size and position of the curved text image to fit your slide layout.
Additional Tips for Curving Text in Google Slides
- Keep It Concise: Curved text works best with short phrases or single words. Too many words can make the curve look crowded and difficult to read.
- Use Contrasting Colors: Make your curved text stand out by using colors that contrast with the background.
- Experiment with Fonts: Different fonts can have varying effects when curved. Try out different fonts to see which works best for your design.
- Consider Placement: Ensure your curved text complements other elements on your slide without overshadowing them.
Frequently Asked Questions (FAQs) About Curving Text in Google Slides
Can I curve text directly in Google Slides?
No, Google Slides does not have a built-in feature for curving text. However, you can use external tools like Troygram, PowerPoint, Canva, Google Drawings, or graphic design software to create curved text and import it into Google Slides.
Is there a way to edit curved text once it’s in Google Slides?
Once the curved text is imported as an image, you cannot edit the text directly in Google Slides. You would need to go back to the external tool, make the changes, and re-import the image.
Are there any free tools for curving text?
Yes, tools like Troygram and Canva offer free options for curving text. Google Drawings is also free, and GIMP is a free alternative to Photoshop.
Can I use curved text for professional presentations?
Absolutely! Curved text can add a creative and professional touch to your presentations, making them more engaging and visually appealing.
What are some alternatives to curving text?
If curving text doesn’t fit your design, consider using other text effects like shadows, reflections, or 3D effects to enhance your presentation.
Final Thoughts
Curving text in Google Slides can elevate the visual appeal of your presentations, making them more dynamic and engaging. While Google Slides doesn’t offer a built-in feature for curving text, using external tools like Troygram, PowerPoint, Canva, Google Drawings, and graphic design software provides effective workarounds. By following the methods outlined in this guide, you can easily add curved text to your slides and create stunning presentations. Experiment with different fonts, colors, and placements to achieve the best results.